|
|
Points Properties - General Dialog An explanation of fields and properties |
Points Properties - General Dialog
To access this dialog:
-
From the Sheets Control Bar (currently-active 3D window sub-folder), open the Points folder. This will display the loaded strings. Each string can be opened up revealing numbered strings starting from zero. Right-click on one of the strings and select Properties. This will display the Strings Properties dialog. Select the General tab
-
Double click a strings object in the Sheets | currently-active window | Strings sub-folder. Select the General tab.
-
Double click a visible 3D points object in any 3D window.
|
|
The settings described here apply to the currently active 3D window and all linked external windows. Independent windows will be unaffected. |
This dialog is used to define how point data is displayed in the 3D window.

The Points Properties dialog comprises the following tabs:
-
General: overview information relating to the selected points object. More...
-
Associated Files: shows a list of other files associated with the object. More...
-
Info Mode List: describes the context-sensitive information shown in the active 3D window about the selected object. More...
Field details:
Name: displays the current name of the selected data object overlay.
Source: shows the name of the loaded object from which the current 3D overlay was derived.
Sequence Column: select a data column from the dropdown for use in sequence animation.
Sequence Options: when a Sequence Column has been defined (see above), the following options are available:
Forward: animate the data file according to the increasing value of the selected attribute column.
Single Frame: replace instead of adding to displayed view frames.
Reverse: select this option to play the sequencing animation in reverse, i.e. from the highest record to the lowest record value in the Sequencing Field.
Anim. Rate: this value represents the 'speed' at which the 'steps' are played. The most appropriate value depends on many factors, including the density of the data and how many 'steps' are in a particular animation.
Anim. Step: this value determines the step size in the animation and equates to the number of records displayed/hidden for each frame. It is based on the values in the selected Sequence Column.
Loop Animation: select this checkbox to replay your animation from the beginning once the final 'frame' has been displayed.
-
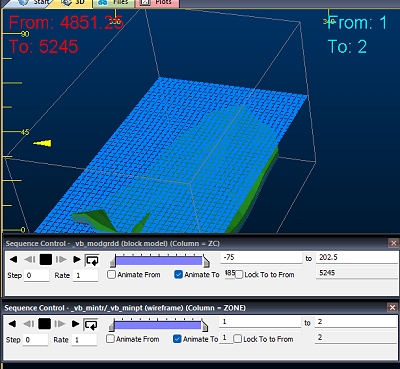
Annotate: select a field from the object that will be shown as on-screen annotation during sequence playback. Select the Show Annotation check box to annotate the wireframe with sequence column data. You can control the formatting of the on-screen annotation using the Configure button to display the Sequence Annotation Overlay dialog. Select Configure to define the annotation's font, position and display text parameters, using the Sequence Annotation Overlay screen.
In the example below, an annotation attribute has been defined for a block model (IJK) and a wireframe (ZONE). Each object is supported by its own Sequence Control bar below. The annotation is displayed for both objects (although configured differently for each). When the sequence slider of either object is adjusted, the corresponding annotation will be updated automatically.

This can be useful for interrogating data with respect to particular attribute values, or combinations of values. For example, you could render a block model using two separate overlays (by copying one), then sequence model 1 based on a grade value and model 2 on a density value.
|
|
Related Topics |
|
|
Points Properties Dialog - SymbolsTabPoints Properties Dialog - Labels TabAssociated Files TabInfo Mode List Tab |


